Fun Retrospectives
This first post is an updated version of an article which I have written in January 2021 for an older blog of mine which I have since discontinued. It was the time when we had to prepare our first distributed/online retrospectives during the Corona lockdown. It describes my experience with Fun Retrospectives, a book, website and very helpful online retro tool.
Introduction
For those who do not know the term “retrospective” (or “retro” for short), I cite the following method-independent definition:
Another agile practice is the retrospective, in which a team having finished a development iteration takes time off further development to reflect on the experience and the lessons learned, with the goal of improving its development process.
— Bertrand Meyer: Agile! The Good, the Hype and the Ugly, pg. 9
Retrospectives are an important agile practice. They facilitate the team’s self-organization and continuous improvement.
The concept was of course not invented by the agile movement. When I started my career in the software industry more than twenty years ago, we used to have a “touch-down” meeting at the end of every project, as we used to have a “kick-off” meeting at the beginning of every project. In other settings, these touch-downs were simply called “lessons-learnt” sessions.
The achievement of the agile movement lies in the importance and value it has given to retrospectives. Scrum development teams do a retro after every sprint, which usually means every 2 to 4 weeks.
There are many books on the theory, philosophy and psychology of retrospectives. Far out at the practical end of the spectrum, there is “Fun Retrospectives” by Paulo Caroli and Tainã Caetano, a book and website which contain a wealth of techniques and activities to “break the ice” in a retro, to get the conversation going and to help uncover the real, hidden issues which bother the team members. Again, the general idea is of course not new: Good facilitators have known such games and activities in pre-agile times. But the book is a good starting point for the novice and a great source of inspiration even for the experienced scrum master.
These types of activities were developed for in-person meetings, as agile methods in general were developed for personal interaction, with developers sharing (depending on the method) one room, one desk, one keyboard or even one lunchbox. But some of the activities can easily be performed in a distributed setting. And, fortunately, the authors have built an online tool where they have implemented a few of them. They have, in fact, implemented their full 7-Step Agenda for Effective Retrospectives.
Let’s look at how to successfully prepare and execute such an online retrospective.
Preparation
To prepare a retrospective for your team, just create a new agenda and configure the seven steps:
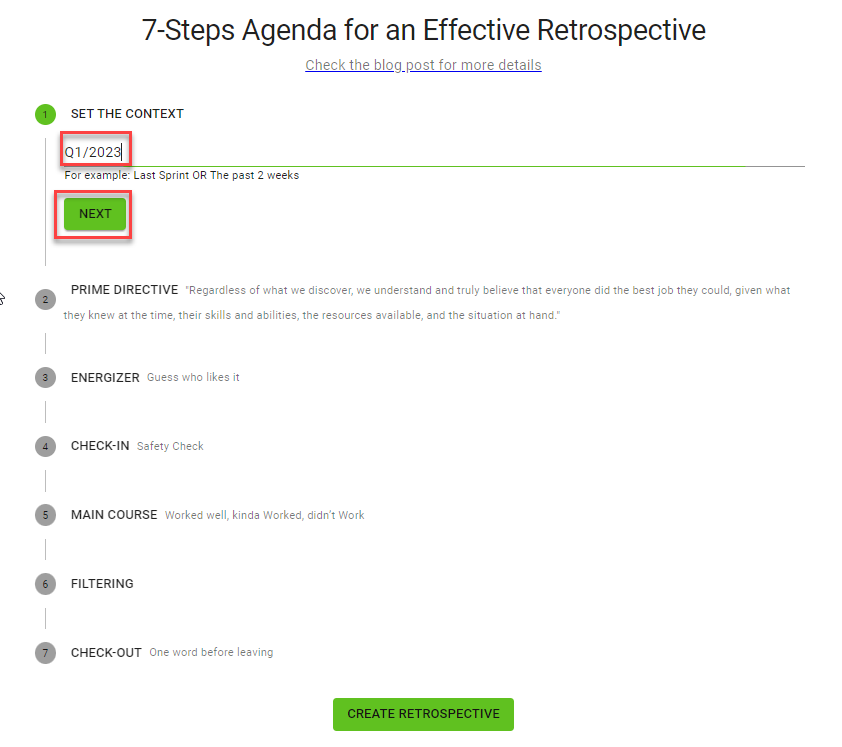
1. CONTEXT
Set the context for the meeting, for example “last sprint” or “last delivery” or “last week’s major incident”. This will align the participants’ expectations as to the scope of the retro. As we are nearing the end of the first quarter, we’ll set the context to “Q1/2023” in the example and then click the NEXT button:
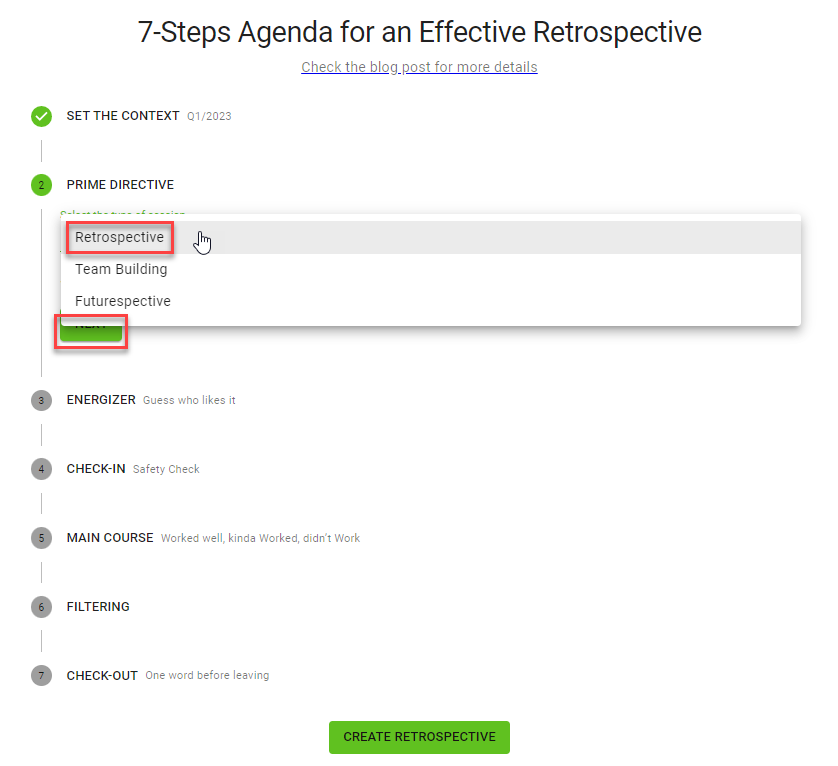
2. Prime Directive
For retrospectives, this is the well-known
Regardless of what we discover, we understand and truly believe that everyone did the best job they could, given what they knew at the time, their skills and abilities, the resources available, and the situation at hand.
— Norm Kerth: Project Retrospectives: A Handbook for Team Reviews
There are similar prime directives for futurespectives and team building meetings. As we’ll do a normal retrospective in the example, we’ll choose “Retrospective” and then click the NEXT button again:
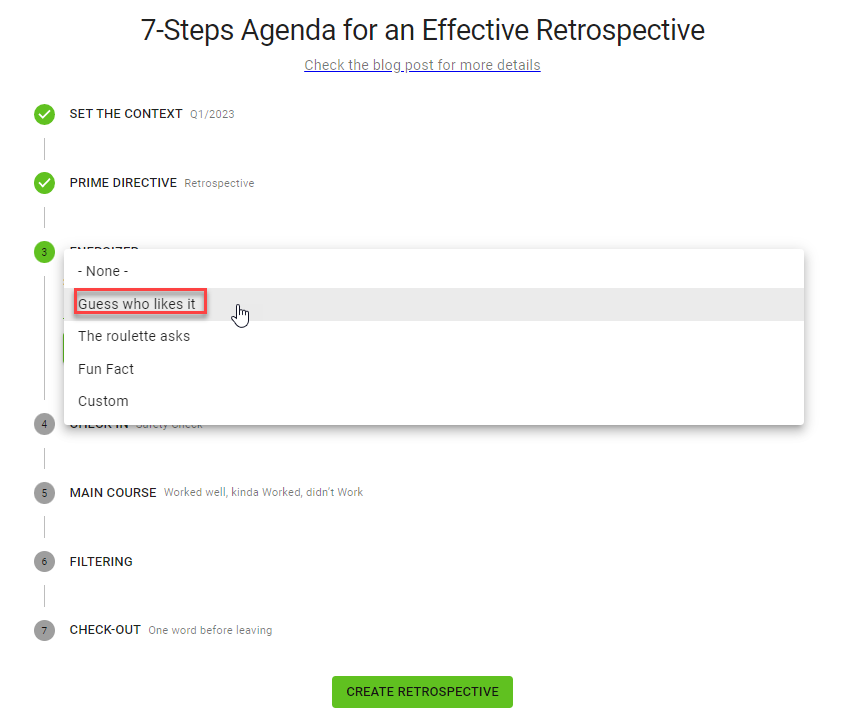
3. Energizer
Choose a first activity to break the ice and get the participants engaged. At the time of this writing, three activities are available: Guess who likes it, The roulette asks and Fun Fact. Alternatively, a custom table can be created or the activity can be skipped by choosing “None”. We’ll choose “Guess who likes it” in the example and then click the NEXT button again:
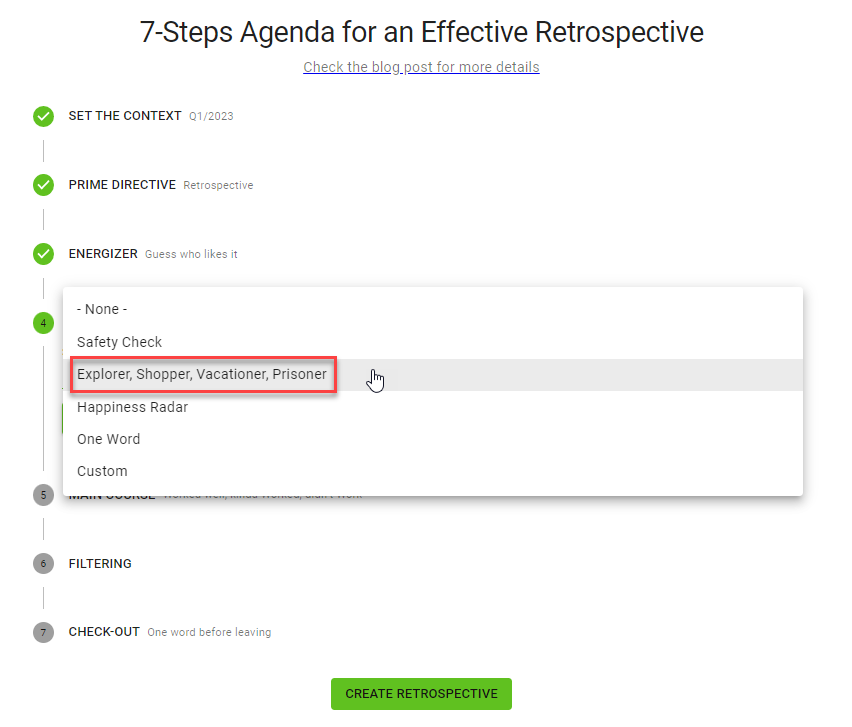
4. Check-in
Choose an activity which allows the participants to reflect and communicate their mood and feelings about the retrospective and the group of participants. At the time of this writing, four activities are available: Safety Check, Explorer, Shopper, Vacationer, Prisoner, Happiness Radar and One Word. Alternatively, a custom table can be created or the activity can be skipped by choosing “None”. We’ll choose “Safety Check” in the example and then click the NEXT button again:
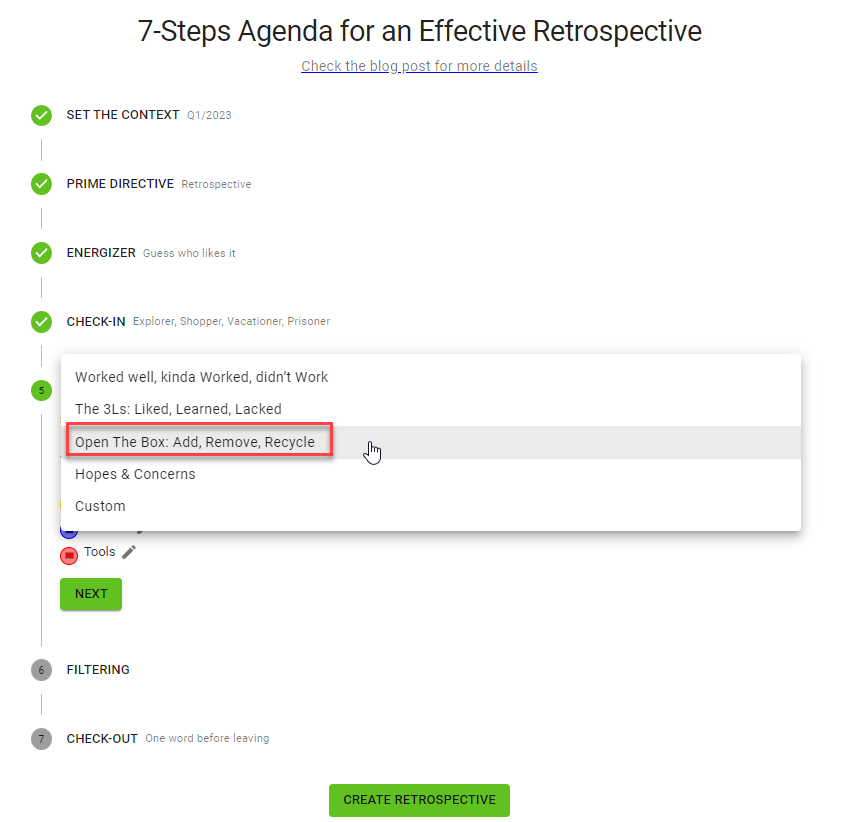
5. Main Course
Choose an activity for the main part of the retrospective where you want to collect feedback about the iteration (or whatever context you have chosen). At the time of this writing, four activities are available: WWW: Worked well, kinda Worked, didn’t Work, The 3 Ls: Liked, Learned, Lacked, Open the Box: Add, Remove, Recycle and Hopes & Concerns. Alternatively, a custom table can be created. We’ll choose “Open the Box: Add, Remove, Recycle” in the example:
All the main course activities allow the participants to post cards with items to be discussed. The cards can be colored for categorization. The default colors are yellow (for category “People”), blue (for category “Process”) and red (for category “Tools”):
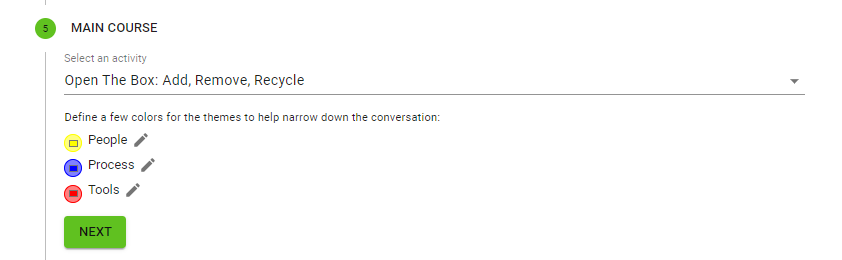
You can change the colors (by clicking on them) or change the labels (by clicking on the pen icons) to group the items along different categories. We’ll leave the default configuration unchanged and click the NEXT button again.
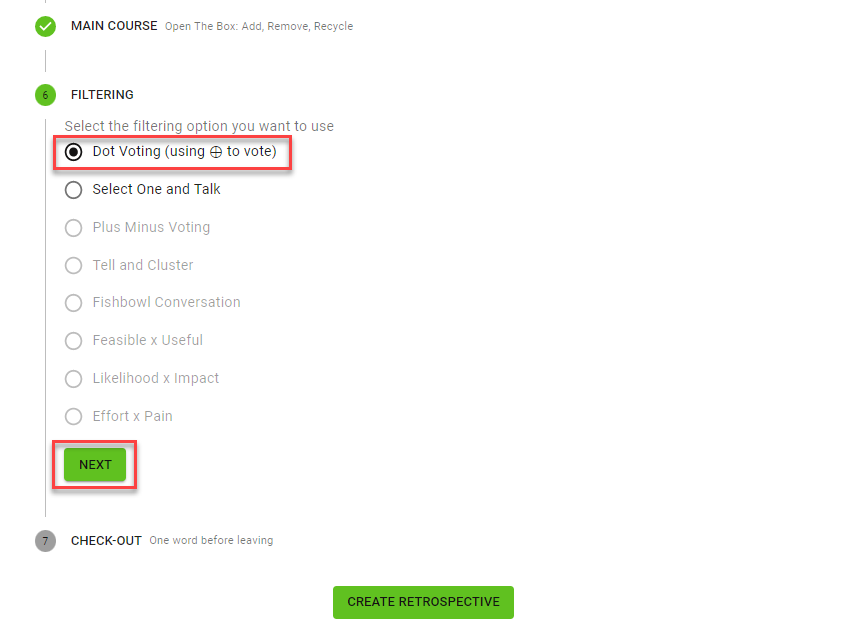
6. Filtering
Define the voting scheme on the items collected in the main course. Dot Voting provides feedback about the relative importance of the items to the majority of the participants whereas Select one and talk allows every participant to discuss the item most important to them. The other voting schemes do not seem to be enabled yet at the time of this writing. We’ll choose Dot Voting in the example and then click the NEXT button again:
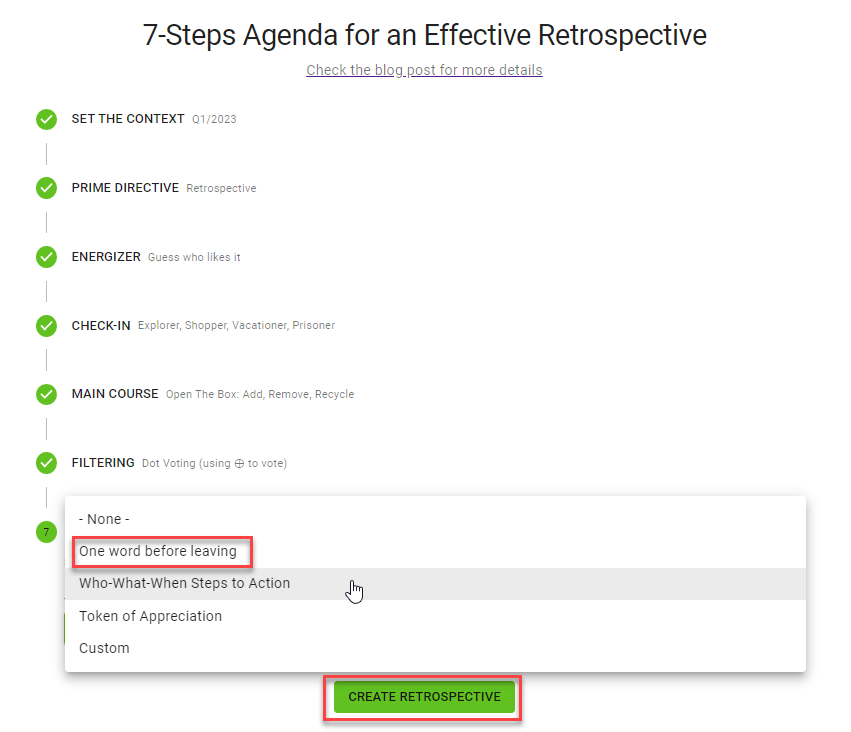
7. Check-out
Choose an activity to close the meeting. At the time of this writing, three very different activities are available: While One word before leaving allows each participant to communicate their feelings at the end of the meeting and Token of appreciation fosters appreciation and acknowlegement between team members, Who-What-When Steps to Action helps to define follow-up actions, deadlines and accountabilities. Alternatively, a custom table can be created or the activity can be skipped by choosing “None”. We’ll choose “One word before leaving” in the example and then click the COMPLETE button and then the CREATE RETROSPECTIVE button:
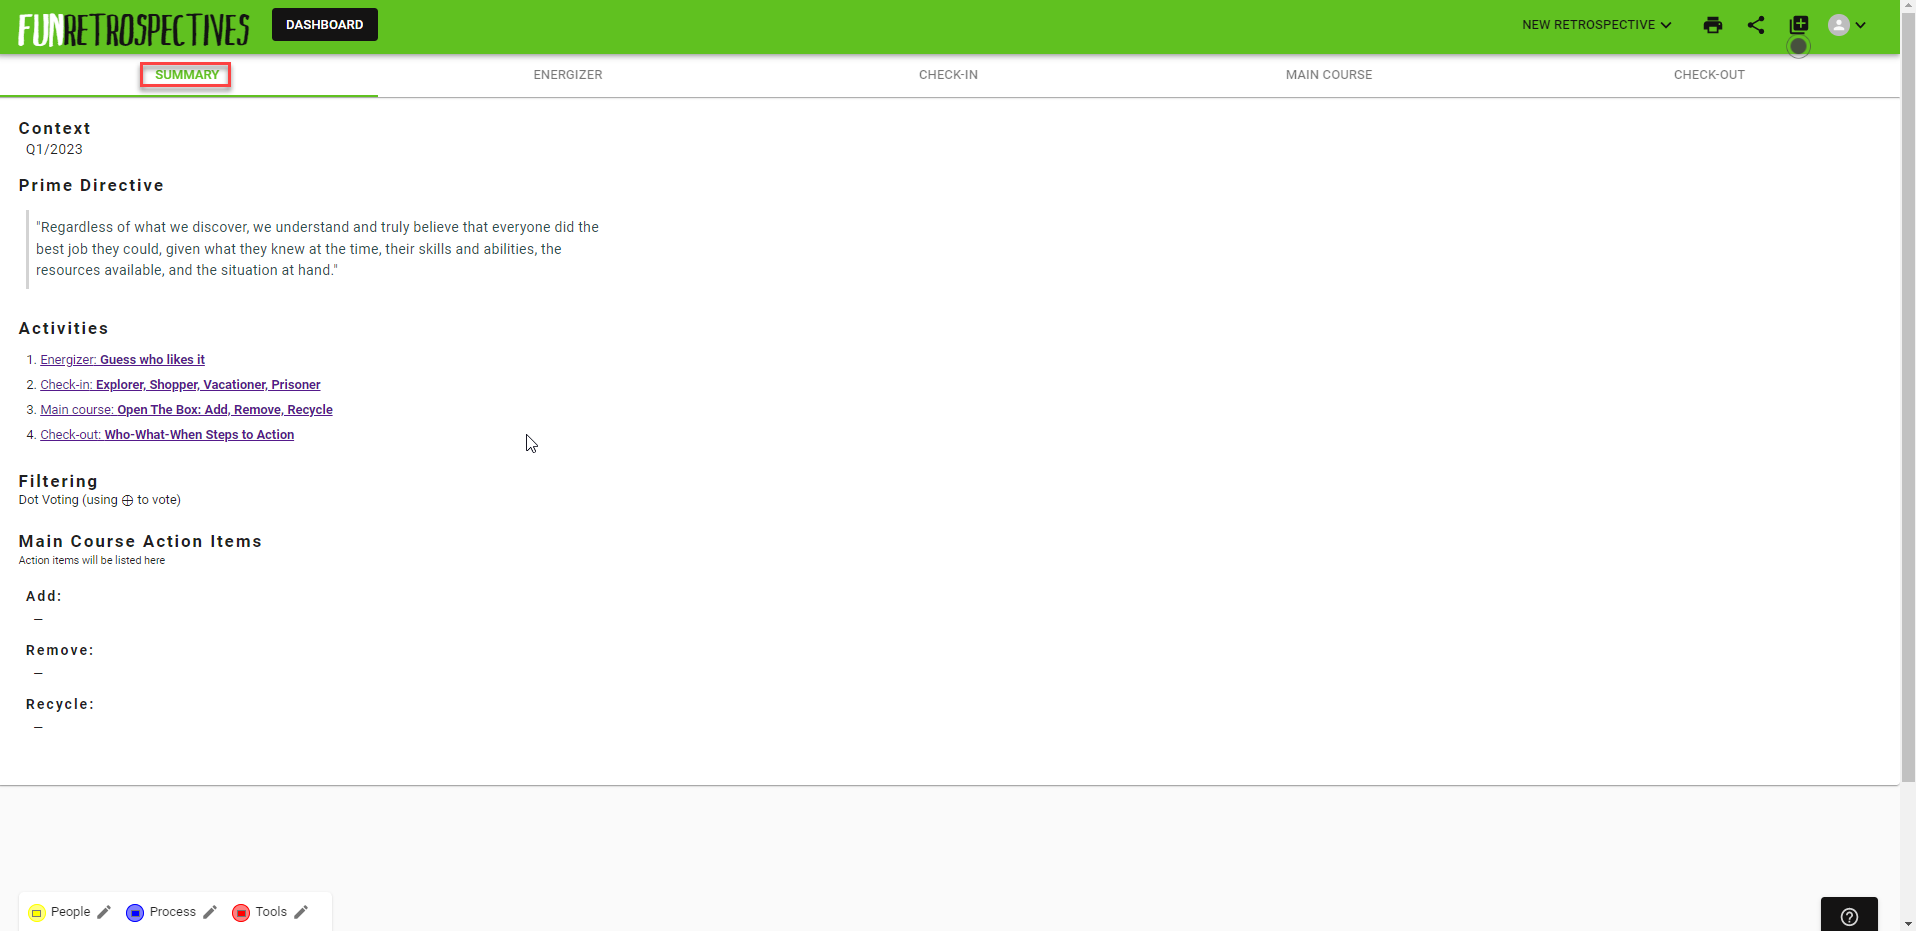
Agenda
This will create the retrospective and show you the agenda (which is called Summary because it will serve as a summary at the end) with the Context, the Prime Directive, the activities chosen for the different courses (Energizer, Check-in, Main Course and Check-out), the filtering (voting scheme) and the skeleton of the main course action items to be elaborated:
You can navigate to the different courses, for example to the Energizer:

And you can add titles or column names for some of the activies. As an example, let’s add instructions for the Energizer activity:

Once everything is correctly configured, you can copy the link (URL) from your browser’s address field and send it to the participants.
Execution
The participants can open the board simply by following the link. Of course you will need a separate tool like skype or zoom for audio (and possibly video) interaction.
After the reading of the Context and Prime Directive from the agenda/summary, all participants need to navigate to the Energizer activity. In our example, they can enter the title of their favorite movie and hit Enter to make it visible to the others:
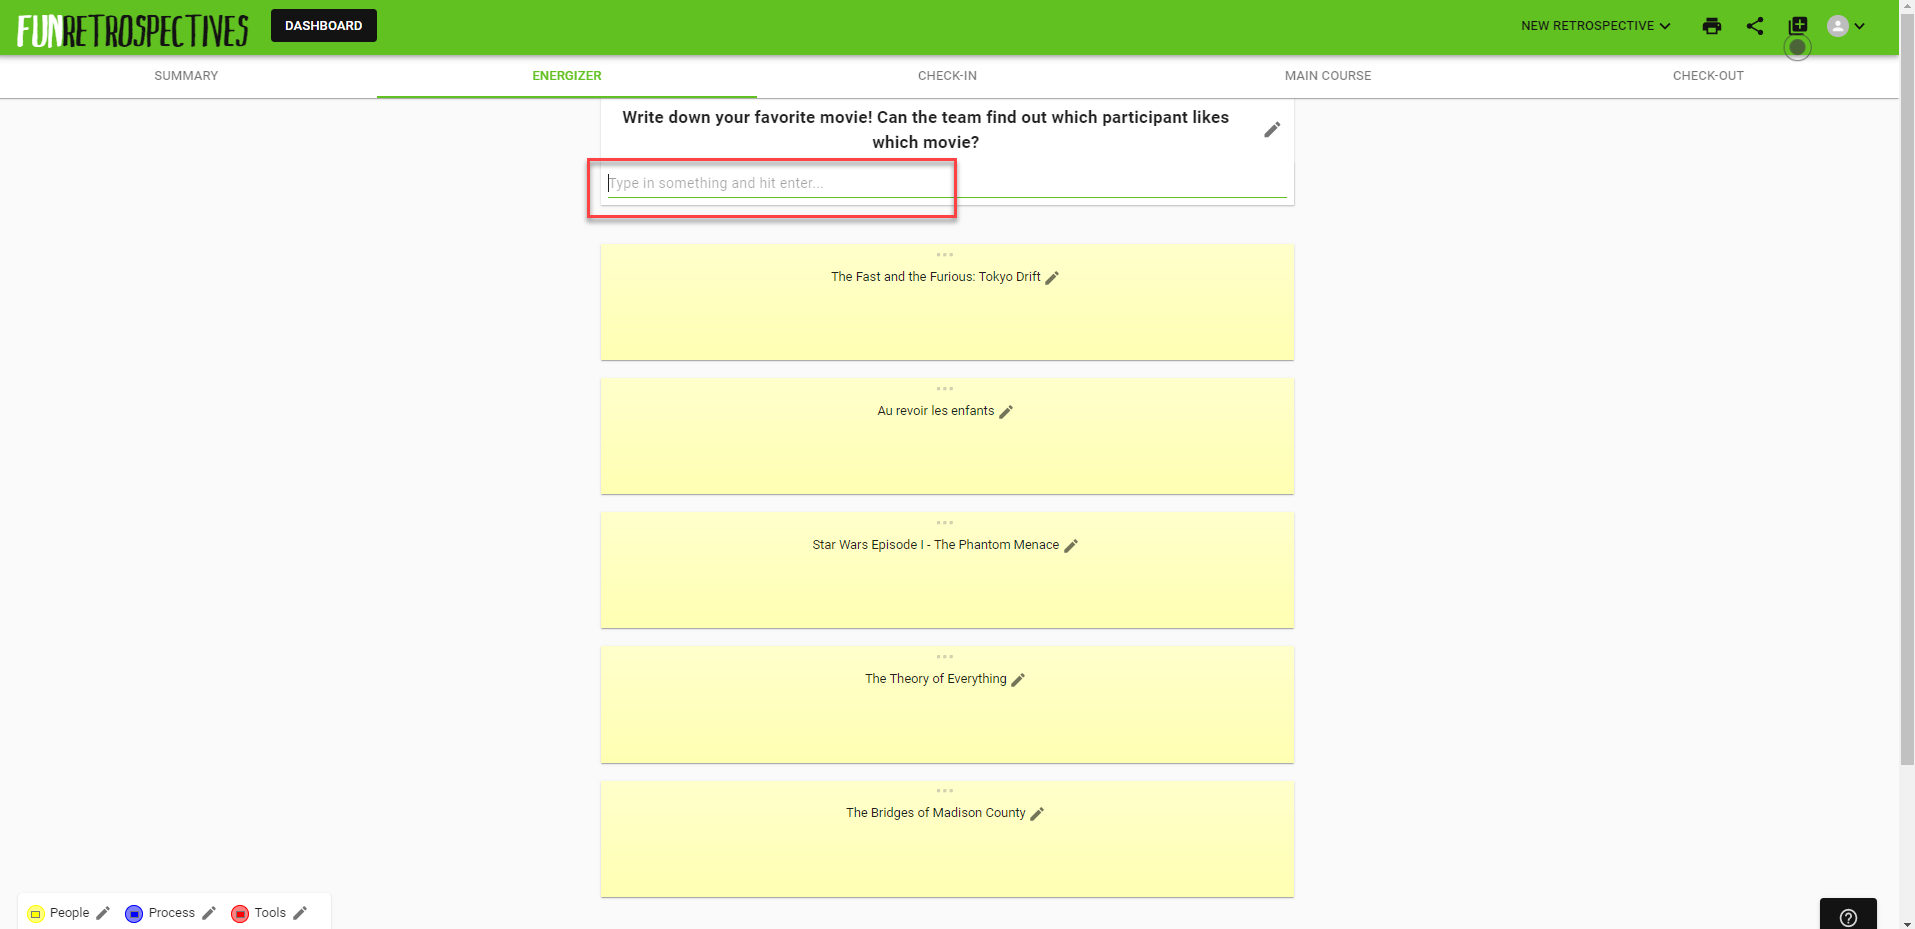
Guessing who likes what will be a lot of fun and warm the players up for the more serious discussions to come.
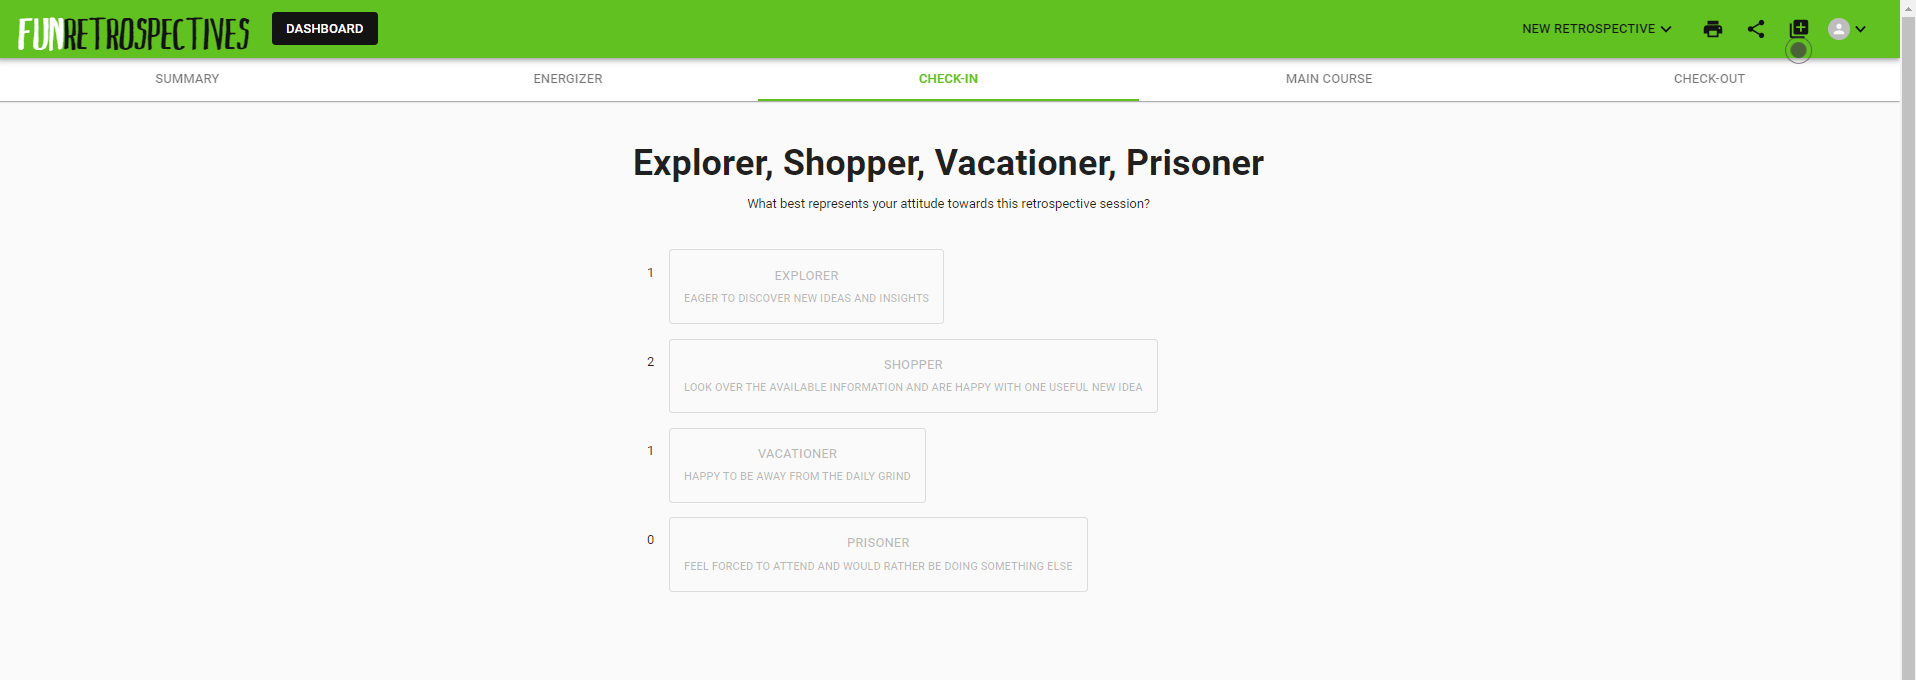
After the Energizer activity, all participants need to navigate to the Check-in activity which in our example is ESVP (Explorer, Shopper, Vacationer, Prisoner) where each participant can anonymously reveal their feelings and expectations towards this retrospective:
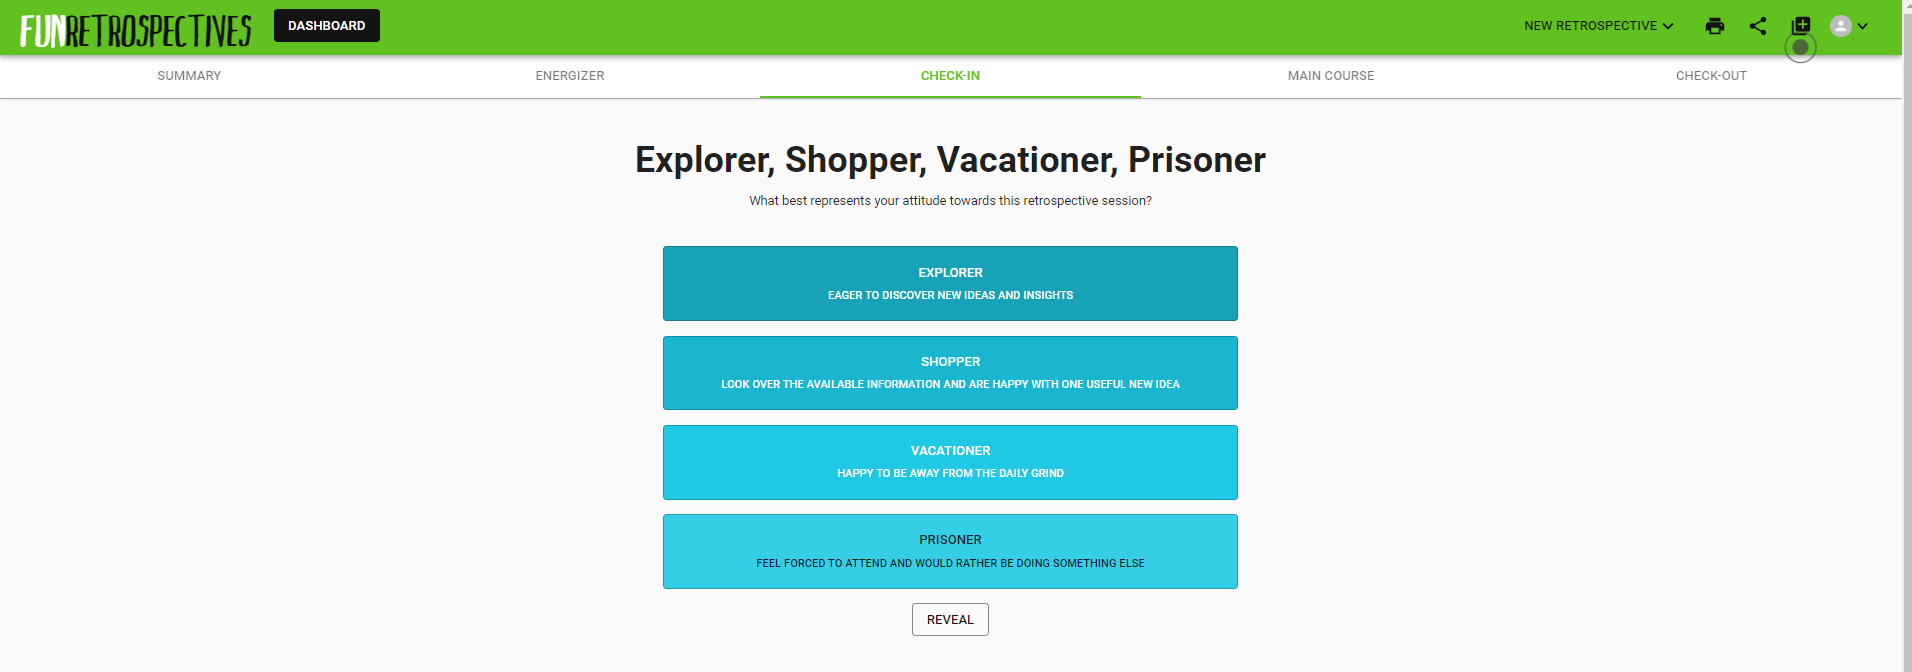
Every participant can hit the button corresponding to the character which fits them most. Once the button is pressed, the count will be anonymously revealed. A participant who does not want to participate in this activity can reveal the count with the REVEAL button:
After the Check-in, all participants need to navigate to the Main Course. In our example, they can enter items which they would like to add, remove or recycle (i.e. keep) into the respective column and hit Enter to make them visible to the others:
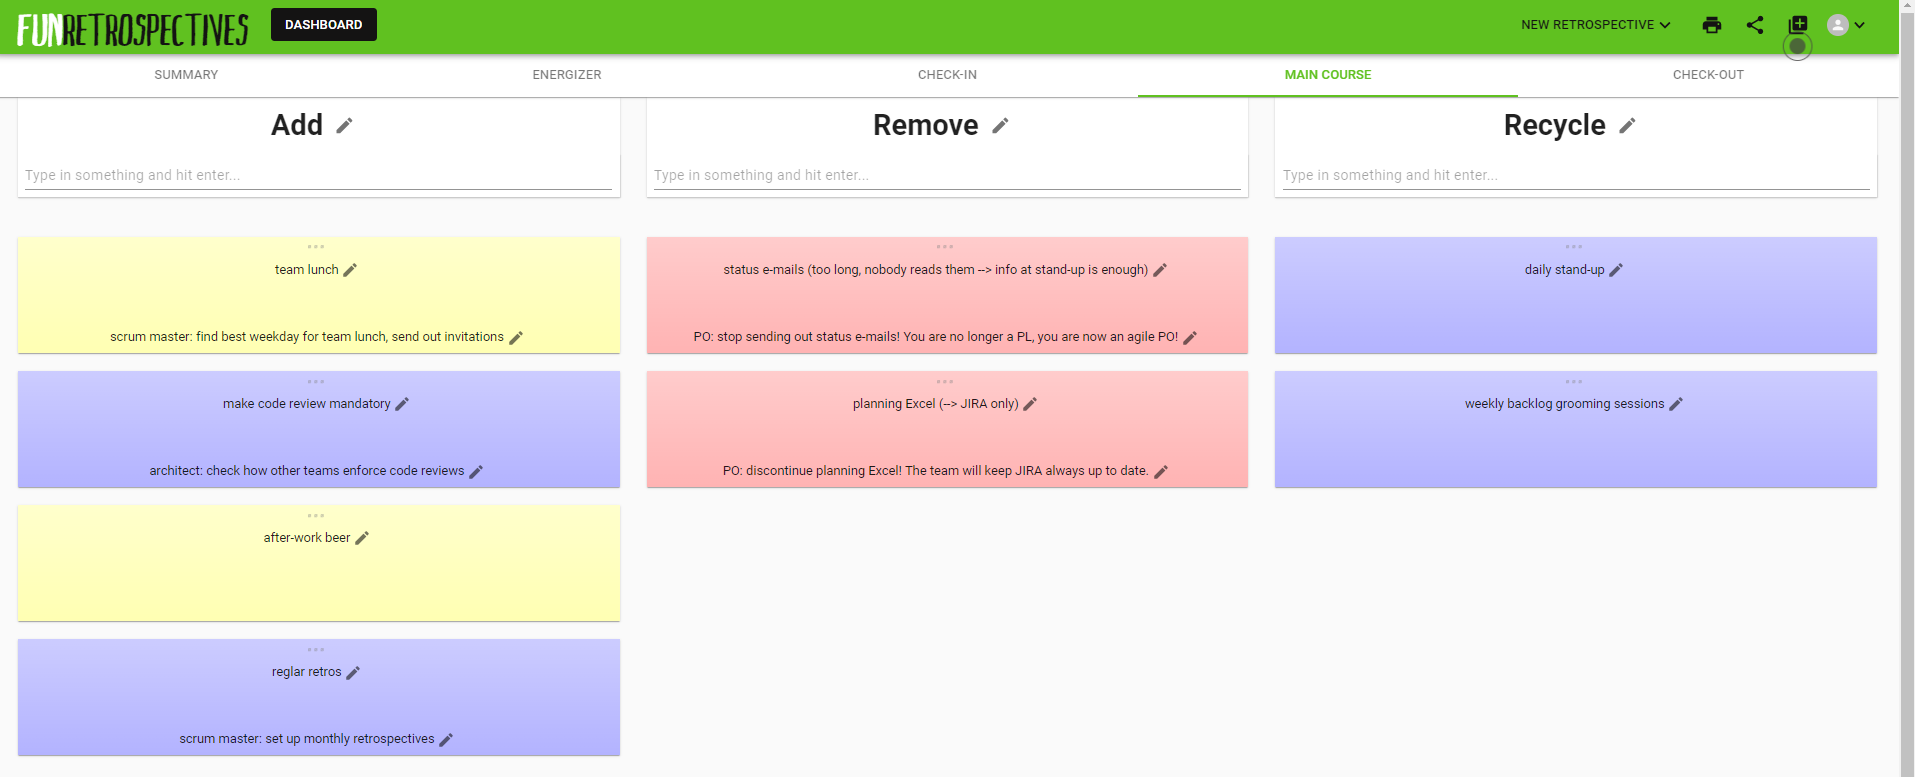
Moving over one of the posts with the mouse shows additional steering elements to modify the post:
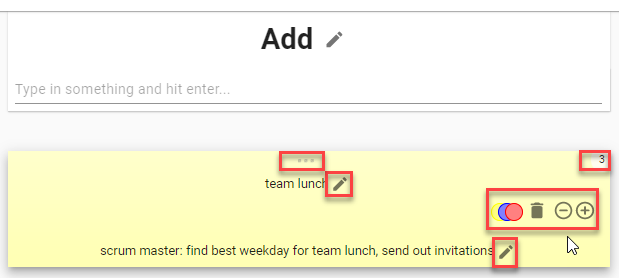
Posts can be edited with the pen icon or deleted with the trashcan icon. Their color can be changed for categorization with the color dots.
Posts can be moved around between rows or columns when the mouse is placed on the three dots at the top of the card. By moving the cards around, the posts can be ordered or clustered.
After all the items have been collected and discussed, they can be voted on with the +/- buttons if dot voting is enabled. The vote count appears in the upper right corner of the card.
Finally, action items can be discussed and written down with the second pen icon at the bottom of the card.
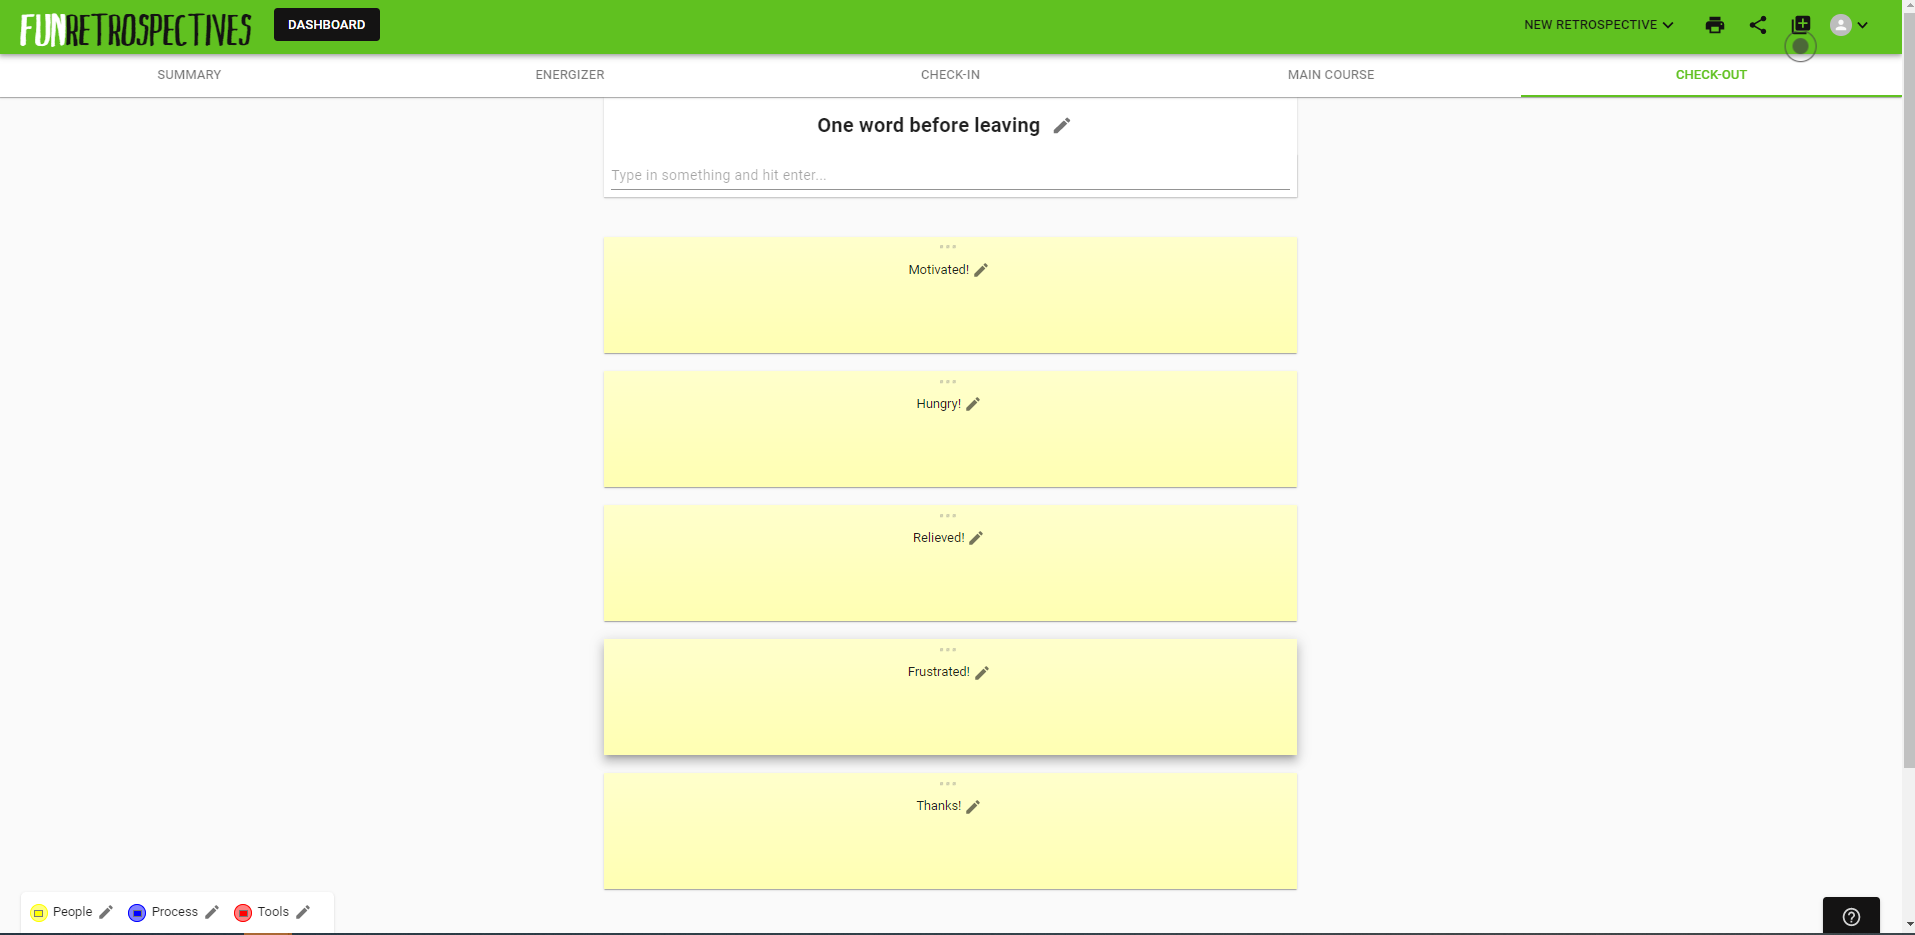
After the Main Course of the retrospective, all participants need to navigate to the Check-out activity. In our example, they can let the others know with one word how they feel after the retro and hit Enter to make it visible to the others:
The action items defined in the Main Course have been added to the summary which can be printed and distributed or stored away:
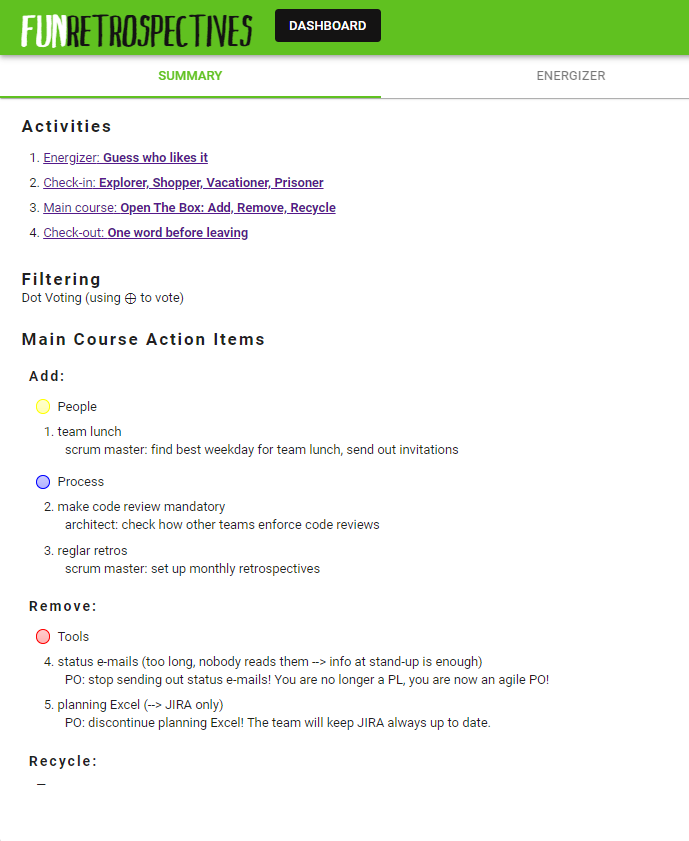
This allows to check at the beginning of the next retro whether this retro’s action items have been implemented. In a real-world example, the action items should of course not only have a responsible person assigned but also a deadline.
Caveats
The tool is free and easy to use. As it is not a commercial tool (and not paid for by advertisements either), it does, however, lack production quality. This manifests itself in a number of drawbacks which you should keep in mind if you want to use it safely and effectively and avoid frustration or even security issues:
- There are no accounts, no log-ins, no passwords. This makes it extremely easy to use but means of course that the data entered is out there on the web, unprotected. Everybody who guesses the link can access it. This is no problem if every participant strictly adheres to the rule that absolutely no personal or classified data whatsoever (names or other personal data of the participants, customer-identifying data or the company’s secrets of trade) may be entered into the board.
- Any participant can modify text entered by another participant or other attributes of a post like the color. Even the colors of the categories or their labels or the activities’ titles or column names could be changed by any participant during the meeting. This is no problem if every participant only does so with explicit permission of the author of the post or the facilitator.
- Participants can post more than once even where they are supposed to post only once (e.g. in the “Who likes it” or “One Word” activities). Likewise, this is no problem if simply no participant does this.
- The number of votes seems to be limited to five votes per participant which might not be quite sufficient if there are many items to vote on.
- As some actions are not undoable, the facilitator should make sure that all participants understand these limitations beforehand. It might therefore be advisable to not include the link in the meeting invitation but only send it out during the meeting after some introductory explanations.
- To ensure that the participants navigate in sync and are always on the same page, it helps if the facilitator can share his screen through a separate video channel.
Again, the tool is free to use without any installation. And in summary, it works well if all participants play by the rules and use common sense and good will. Just give it a try! And whatever tool you use, have a look at the Fun Retrospectives book or website if you are looking for inspiration.